
No-Bake Grinch Oreo Truffles

Bright green, no-bake truffles made from red velvet Oreos, cream cheese, and green candy melts — a playful Grinch-themed treat perfect for parties and holiday gifting.

This festive, no-bake treat began as a playful idea the first year I wanted a Grinch-themed dessert for a small holiday gathering. I wanted something quick, colorful, and irresistibly bite-sized that would make guests smile the moment they saw it. Using a package of Red Velvet Oreos and a little cream cheese, these truffles come together like magic: the cookie crumbs bind with the creaminess of the cheese to form a dense, fudgy center, and the glossy green coating gives them that instantly recognizable Grinch look. They’re sweet, slightly tangy, and have a soft, melt-in-your-mouth texture that contrasts beautifully with the crisp outer shell.
I discovered this combination while pulling ingredients from the pantry and fridge one evening when I needed a last-minute dessert. The simplicity of the technique — pulse, mix, chill, dip — makes these ideal for busy hosts, last-minute gifts, or a playful family baking session. The red cookie base peeks through occasionally in the center, creating a delightful color contrast against the vibrant green exterior and the tiny red heart that finishes each bite. These truffles are decorative enough for a holiday table yet simple enough to make on a weekday for an indulgent snack.
Why You'll Love This Treat
- Quick assembly: Ready in about 30–45 minutes including chilling time — perfect for last-minute plans or a quick party contribution.
- Kid-friendly process: No stove required and easy rolling tasks make this a great family activity that kids can help with safely.
- Pantry-friendly ingredients: Uses common items like a package of Red Velvet Oreos and cream cheese; green candy melts are inexpensive and widely available.
- Highly customizable: Swap candy melt colors or sprinkles to match any party theme without altering technique or texture.
- Great for gifting: Stack in a small box with parchment for a charming homemade present that travels well.
- Minimal equipment: A food processor and a microwave-safe bowl are all you really need, keeping cleanup simple.
When I first brought these to a holiday cookie swap, people assumed they'd taken all afternoon to prepare. They loved that a single package of cookies stretched into nearly two dozen elegant bites, and the little red hearts on top felt like a tiny surprise. Watching my niece place each heart carefully while humming made the whole process feel like a craft project as much as a dessert.
Ingredients
- Red Velvet Oreo Cookies: One 22-count package — pulsed into fine crumbs. Choose the classic Red Velvet variety for the right color and flavor balance; look for a fresh package so crumbs are dry rather than stale.
- Cream Cheese: 4 ounces (1/2 cup), full-fat and softened to room temperature. Full-fat gives the best texture and helps the cookie crumbs bind into a smooth, fudgy center. If using low-fat, expect a slightly firmer, less tender interior.
- Green Candy Melts: 7 ounces (about 3/4 cup). Candy melts give a glossy, quick-setting shell; pick a reliable brand like Wilton or Mercken's for even melting and shine.
- Red Heart Sprinkles: Small hearts for garnish — these create the playful Grinch-heart finish. Use sugar hearts or edible confetti that won’t bleed color on contact with the coating.
- Optional Thinner: 1/2 teaspoon coconut oil or neutral vegetable oil to loosen the candy melts if needed. Use sparingly — too much oil will prevent the coating from setting firmly.
Instructions
Prepare the Workstation: Line a large baking sheet with parchment paper and set it nearby. This gives you a clean surface for placing dipped truffles and makes cleanup effortless. Have a tablespoon measure and a small bowl of warm water ready to wet your fingertips if the dough sticks. Pulse Cookies: Place the Red Velvet Oreo cookies (filling and all) into a food processor and pulse until you have very fine crumbs. Aim for the texture of coarse sand — this helps the crumbs bind uniformly with the cream cheese without any large pieces that will break the exterior shell. Make the Dough: Add the softened 4 ounces of cream cheese to the crumbs and pulse or mix until the mixture forms a soft, cohesive dough. Stop as soon as the dough comes together — overmixing warms the cream cheese and can lead to an oily texture. The dough should hold its shape when pinched. Form Balls and Chill: Using a 1-tablespoon measure or small cookie scoop, portion the dough and roll gently between your palms to form smooth balls. Place them on the prepared sheet and chill in the freezer for 30 minutes; chilling firms the center and makes dipping neater and easier. Melt Candy Coating: In a microwave-safe bowl, melt the 7 ounces of green candy melts in 30-second bursts, stirring between intervals until smooth. If the coating seems too thick for dipping, add up to 1/2 teaspoon of coconut or neutral oil and stir thoroughly. The correct viscosity should coat the back of a spoon evenly. Dip and Decorate: Using a dipping fork or two forks, submerge each chilled truffle into the melted candy, let excess drip off, then set back on parchment. Transfer remaining candy to a piping bag (or a plastic bag with a snipped corner) and drizzle over the tops, adding a small red heart sprinkle while the coating is still tacky to create the Grinch-heart detail. Set and Serve: Place the coated pieces in the refrigerator for a few minutes to fully set the shell. Enjoy within a week when stored in an airtight container in the fridge, or freeze for longer storage.
You Must Know
- These treats are best kept chilled; the cream cheese center softens quickly at room temperature, so refrigeration preserves texture and shelf life.
- They freeze well for up to 3 months — freeze in a single layer on a tray then transfer to a sealed container with parchment between layers.
- One package yields about 22 truffles; adjust quantities proportionally if you need more or fewer bites.
- Because Oreos contain wheat and soy and the recipe uses cream cheese, this is not suitable for those avoiding gluten or dairy.
- Use a small amount of neutral oil sparingly to thin candy melts; too much will prevent the shell from setting to a firm snap.
My favorite thing about these is the reaction they get: people love the bright green surprise and the tiny red heart makes each bite feel made just for them. For parties, I arrange them on a simple white platter so the color pops — they look whimsical and professional without a lot of fuss. I often make a double batch because one never seems to be enough.
Storage Tips
Store finished pieces in a single layer or separated by parchment in an airtight container in the refrigerator for up to 7 days. For longer storage, freeze on a tray until solid, then stack between sheets of parchment in a freezer-safe box for up to 3 months. When reheating from frozen, thaw in the refrigerator for a few hours to prevent condensation on the coating; bring to almost room temperature before serving for the best texture. Avoid leaving them out at room temperature for more than 30–60 minutes to prevent softening of the cream cheese center.
Ingredient Substitutions
If you can’t find Red Velvet Oreos, use any chocolate sandwich cookie or double-stuffed variety for a richer center; plain chocolate Oreos will change the color contrast but the texture remains excellent. For a dairy-free option, try vegan cream cheese and confirm vegan candy melts are used — flavors will shift slightly and texture may be firmer. If you prefer a different coating, tempered chocolate can replace candy melts for a deeper flavor and stronger snap; add 1 tsp neutral oil only if the melted chocolate becomes too thick for dipping.
Serving Suggestions
Serve chilled on a decorative platter or in mini paper liners for a bite-sized presentation. These pair beautifully with hot chocolate or spiced coffee at winter gatherings and add a playful note to cookie trays. For gifting, layer in a small box with wax paper and a ribbon; for a dessert table, group with red and white sweets to echo the Grinch color palette. Garnish with extra tiny edible hearts or a light dusting of gold edible shimmer for a festive finish.

Cultural Background
These playful bites are a modern American holiday creation inspired by no-bake confection techniques and character-themed desserts. The practice of repurposing sandwich cookies into truffle-style confections has roots in mid-century home baking where convenience met creativity. The Grinch theme borrows from beloved holiday storytelling — transforming classic cookie flavors into colorful, character-driven desserts is part of a larger trend of whimsical party foods that delight both kids and adults, blending nostalgia with inventive presentation.
Seasonal Adaptations
Change the coating color and sprinkles to match seasons — pastel melts for spring, orange and black for Halloween, or metallics for New Year’s. For summer parties, dip in white chocolate and add tropical coconut flakes. For a Valentine’s twist, swap the little red hearts for tiny conversation hearts or pink sprinkles. The base technique remains the same, so seasonal swaps are quick and effective without altering texture or prep time.
Meal Prep Tips
Make the centers up to 2 days ahead and keep them chilled until you’re ready to dip — this streamlines party day prep. Alternatively, freeze pre-formed balls on a tray and dip from frozen to speed up the coating process. Use a cooling rack over a tray to catch drips for easy cleanup and rotate the tray in the fridge between batches if your kitchen is warm; this prevents melted coating from running and keeps shapes neat. Label and date any frozen containers for easy rotation.
These no-bake truffles are proof that simple ingredients and a little imagination deliver something special. Whether you’re making them for a holiday table, a school bake sale, or a cozy night in, they bring color, sweetness, and a smile to every bite. Have fun with the decorations and make them your own.
Pro Tips
Chill the formed balls before dipping to prevent the centers from crumbling during coating.
If candy melts are too thick, add no more than 1/2 teaspoon of neutral oil and stir thoroughly; test on one truffle first.
Work quickly once the coating is melted; it firms as it cools and becomes harder to drizzle.
Use a small piping bag or a plastic zip-top bag with a tiny corner snipped for precise drizzling.
Store in a single layer or separate layers with parchment to prevent sticking and preserve presentation.
This nourishing no-bake grinch oreo truffles recipe is sure to be a staple in your kitchen. Enjoy every moist, high protein slice — it is perfect for breakfast or as a wholesome snack any time.
Tags
No-Bake Grinch Oreo Truffles
This No-Bake Grinch Oreo Truffles recipe makes perfectly juicy, tender, and flavorful steak every time! Serve with potatoes and a side salad for an unforgettable dinner in under 30 minutes.
Ingredients
Main
Instructions
Prepare the workstation
Line a baking sheet with parchment paper, measure tools, and have a tablespoon scoop ready. This organizes your space and speeds up the dipping process.
Pulse the cookies
Place the full cookies in a food processor and pulse to fine crumbs. Aim for a sandy texture so the crumbs bind evenly with the cream cheese.
Make the dough
Add 4 ounces of softened cream cheese to the crumbs and pulse until a soft dough forms. Mix just until combined to avoid warming the cheese.
Form and chill
Portion using a 1-tablespoon scoop, roll into balls, place on the prepared sheet, and freeze for 30 minutes to firm up.
Melt candy coating
Melt 7 ounces of green candy melts in 30-second bursts, stirring until smooth. Thin with up to 1/2 tsp oil if necessary for dipping consistency.
Dip, decorate, and set
Dip each chilled ball in coating using a dipping fork, drizzle with remaining coating from a piping bag, add a red heart sprinkle, and refrigerate to set.
Last Step: Please leave a rating and comment letting us know how you liked this recipe! This helps our business to thrive and continue providing free, high-quality recipes for you.
Nutrition
Did You Make This?
Leave a comment & rating below or tag
@moodcooks on social media!
Categories:
You might also like...

Air Fryer Bang Bang Cauliflower
Crispy air-fried cauliflower tossed in a creamy sweet-spicy bang bang sauce — a crunchy, vegetarian appetizer or weeknight favorite that's ready in about 30 minutes.

Air Fryer Buffalo Cauliflower
Crispy battered cauliflower florets tossed in tangy buffalo sauce — a spicy, vegetarian crowd-pleaser ready in under 40 minutes.
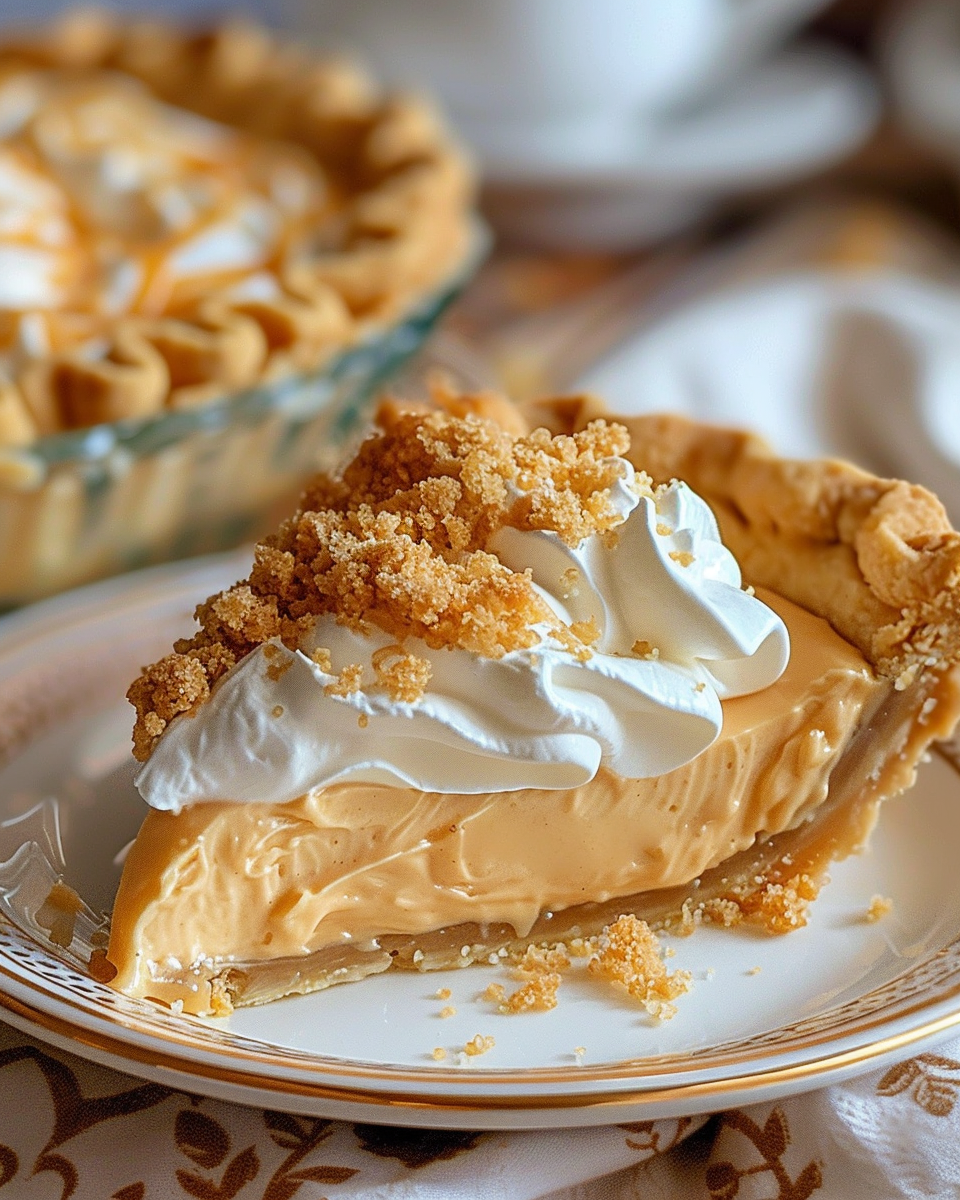
Amish Peanut Butter Cream Pie
A nostalgic, no-bake peanut butter cream pie inspired by Amish kitchens—silky peanut butter filling, crunchy crumbles, and pillowy whipped topping in a buttery 9-inch crust.
Did You Make This?
Leave a comment & rating below or tag @moodcooks on social media!
Rate This Recipe
Share This Recipe
Enjoyed this recipe? Share it with friends and family, and don't forget to leave a review!
Comments (1)
This recipe looks amazing! Can't wait to try it.
Comments are stored locally in your browser. Server comments are displayed alongside your local comments.

Hi, I'm Olivia!
What's Popular
30-Minute Meals!
Join to receive our email series which contains a round-up of some of our quick and easy family favorite recipes.