
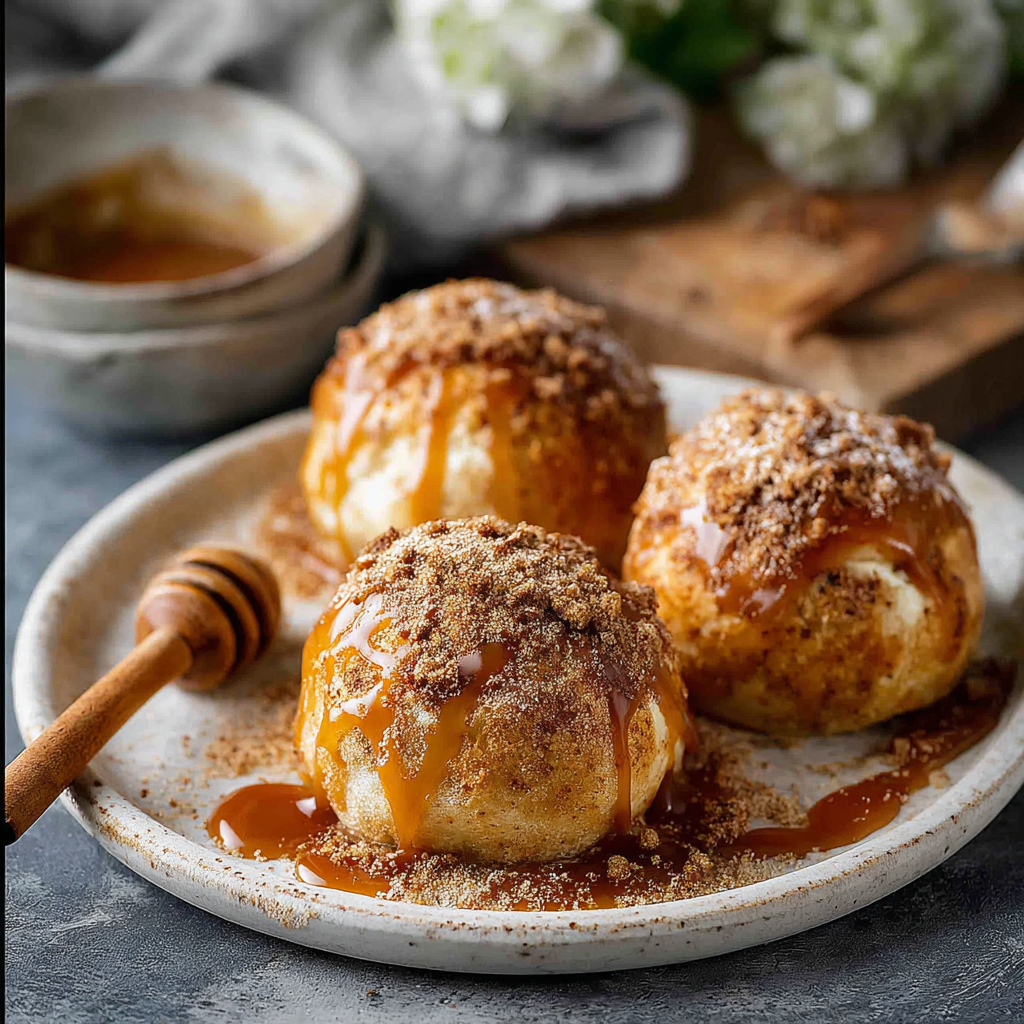
Caramel Apple Pie Bombs

Handheld bites of spiced apple filling and melted caramel wrapped in flaky biscuit dough — a cozy, easy dessert perfect for parties or weeknight treats.

This mini indulgence began as a hurried attempt to capture the warm nostalgia of apple pie without the fuss of rolling dough. I wanted something that smelled like a bakery, tasted like fall, and could be eaten standing up while everyone chatted at a party. The result was these caramel apple pie bombs: tiny parcels of tender, cinnamon-kissed apple wrapped in flaky biscuit dough with a molten caramel center. They hit the sweet spot between nostalgic and playful, and they disappeared faster than I could plate them.
I first made them on an overcast Sunday afternoon when unexpected guests arrived. With a can of refrigerated biscuit dough in the fridge and a couple of apples in the fruit bowl, I scrambled together a quick filling and tucked a caramel piece into each dough round. Fifteen minutes later the house smelled like pie, and my friends asked for the recipe. What makes them special is the contrast in textures — soft, jammy apple, molten caramel, and a golden, slightly crisp exterior — plus the speed: you can go from pantry to warm bites in under 40 minutes.
Why You'll Love This Recipe
- Ready in under 40 minutes, these bites turn pantry ingredients into a dessert that tastes like it came from a bakery without the time investment.
- Uses accessible store-bought refrigerated biscuit dough — no rolling or advanced pastry skills required — perfect for beginner cooks.
- Make-ahead friendly: the filling can be prepped up to 2 days in advance and stored in the fridge to save assembly time before guests arrive.
- Portable and crowd-pleasing: each portion is handheld, making them ideal for parties, potlucks, or cozy family nights in.
- Customizable: swap the caramel for chocolate or add chopped nuts for crunch; they adapt well to dietary tweaks and flavor experiments.
- Minimal cleanup: a single skillet and baking sheet do all the work, so you’ll have more time to socialize and less time at the sink.
In my experience these are always the first thing to vanish at gatherings. My kids love pressing their thumbs into the dough to peek at the caramel, and friends often ask for the secret: it’s simple — quality butter, good cinnamon, and not overfilling each pocket. The hurried, joyful energy of assembling these together has become part of the pleasure: everyone crowds the kitchen, passing pieces of caramel and laughing as the timer ticks down.
Ingredients
- Apples: Use 2 medium firm apples (Granny Smith or Honeycrisp preferred). They hold shape when cooked and provide a bright, tart contrast to the caramel. Peel and finely chop for even texture.
- Brown sugar: 2 tablespoons of packed brown sugar adds molasses depth and helps caramelize the apples as they sauté; light or dark both work.
- Ground cinnamon: 1 teaspoon for warm spice — use Ceylon for a delicate aroma or regular cassia for bolder flavor.
- Salt: A small pinch enhances sweetness and rounds flavors; kosher salt dissolves easily in the mixture.
- Unsalted butter: 1 tablespoon to sauté the apples; it creates a glossy finish and adds richness without overpowering the fruit.
- Refrigerated biscuit dough: 1 can (16.3 ounces). Choose plain or flaky biscuits — the dough forms a tender, golden shell.
- Caramel candies: 8 individually wrapped pieces. Classic caramels (e.g., unwrapped Kraft caramels) create a molten center when baked; unwrap before use.
- Melted butter: 2 tablespoons for brushing the tops so they brown evenly and finish with a slightly crisp exterior.
- Cinnamon sugar (optional): A mix of 1 tablespoon granulated sugar and 1/2 teaspoon ground cinnamon to sprinkle for a pretty and tasty finish.
Instructions
Prepare the apple filling: Peel, core, and finely chop 2 medium apples into roughly 1/4-inch pieces so they cook quickly and evenly. In a small skillet over medium heat, melt 1 tablespoon butter. Add 2 tablespoons packed brown sugar, 1 teaspoon ground cinnamon, and a pinch of salt. Stir in the apples and cook for about 6 to 8 minutes, stirring occasionally, until the apple pieces are tender but not mushy and the liquid has reduced to a glossy, slightly syrupy coating. Remove from heat and let cool completely; excess moisture will make the dough soggy. Preheat and prep: Preheat the oven to 375°F (190°C). Line a baking sheet with parchment paper or a silicone mat to prevent sticking. Lightly flour your work surface if needed when handling the biscuit dough. Portion the dough: Open the 16.3-ounce can of refrigerated biscuit dough and separate into the individual rounds (you should have 8). Using your fingers or a rolling pin, gently flatten each round to roughly double its original diameter, about 1/8 inch thick, creating enough space for the filling while leaving ample edge to seal. Assemble the bombs: Place about 1 to 1 1/2 tablespoons of the cooled apple filling in the center of each flattened dough round. Nestle one unwrapped caramel candy on top of the apple mixture, pressing it slightly into the apples. Fold the edges of the dough up and around the filling, pinching and sealing thoroughly at the top. If needed, use a small amount of water on your fingertips to help seal the dough. Make sure there are no gaps where caramel can seep out. Finish and bake: Arrange the sealed bombs seam-side down on the prepared baking sheet, leaving space between each. Brush the tops with 2 tablespoons melted butter to promote even browning. If desired, sprinkle each with a little cinnamon sugar. Bake at 375°F for 12 to 15 minutes, rotating the sheet halfway, until the tops are golden brown and puffed. Remove from oven and let cool 5 minutes before serving so the caramel sets slightly but remains gooey.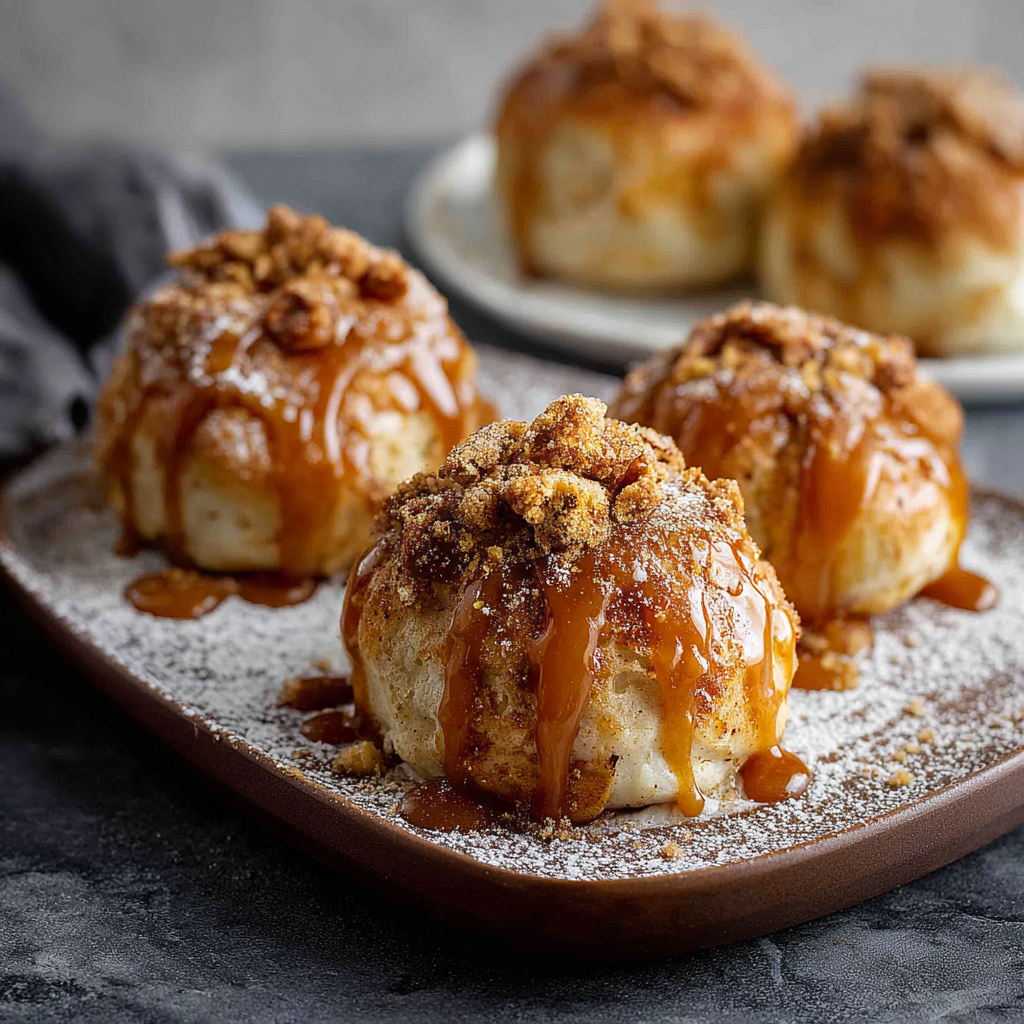
You Must Know
- These bites are best served warm — the caramel is molten right out of the oven; allow 4–5 minutes to cool for safer eating without losing the gooey center.
- Store cooled leftovers airtight in the refrigerator for up to 3 days; reheat in a 350°F oven for 8–10 minutes to revive the crust and melt the center again.
- Freeze assembled and sealed bombs (unbaked) on a tray for 1 hour, then transfer to a bag for up to 2 months; bake straight from frozen, adding about 6–8 minutes to the bake time.
- Mind the caramel: if a bomb bursts while baking, remove it from the oven and spoon any hot caramel back into place with a knife — it will still be delicious, just a bit rustic.
My favorite part of making these is the communal assembly — everyone gets to pinch and seal their own. At my last gathering, a friend who swore she didn’t like apple desserts had three helpings after one bite because the warm caramel softened the tart apple in a way she found irresistible. The little imperfections — a caramel peek here, a slightly lopsided seal there — make them feel homemade, and that warmth translates to the table.
Storage Tips
Once cooled, store leftover pieces in an airtight container in the refrigerator for up to 3 days. Place paper towel under the bombs to absorb any excess moisture and prevent sogginess. To reheat, preheat the oven to 350°F and place the bites on a baking sheet for 8–10 minutes until the exterior is crisp and the caramel is soft again; avoid microwaving because it can make the dough rubbery and overheat the caramel. For longer storage, freeze unbaked, sealed bombs on a tray for an hour, then transfer to a freezer bag for up to 2 months. Bake from frozen, increasing time by 6–8 minutes and checking for a golden top.
Ingredient Substitutions
If you’re avoiding dairy, use a dairy-free biscuit dough and vegan caramel alternatives made from coconut milk. For a gluten-free version, choose a certified gluten-free refrigerated dough or make small rounds from gluten-free pie crust — note that texture will be different and may be crumblier. Swap caramels for dark chocolate pieces for a less-sweet, richer center; use diced nut brittle or a spoonful of Nutella for a nutty twist. If apples are out of season, pear works beautifully but stews faster, so reduce cooking time by a minute or two and keep pieces slightly larger to retain texture.
Serving Suggestions
Serve warm on a platter lined with a linen napkin for a cozy presentation. Garnish with a light dusting of powdered sugar or a drizzle of warm caramel sauce for extra decadence. Pair with vanilla ice cream or a dollop of whipped cream for contrast; a scoop of cinnamon ice cream is especially delightful. These bites work well at brunch with coffee or cider, or as a sweet finger-food at fall parties. For a festive touch, serve on a wooden board with small tongs so guests can help themselves.
Cultural Background
These handheld parcels reinterpret classic American apple pie flavors in a portable format. The idea of enclosing sweet fillings in dough echoes global traditions — from European hand pies to Latin American empanadas — but these specific flavor pairings (spiced apple and caramel) are rooted in autumnal American desserts. The use of refrigerated biscuit dough is a modern convenience popularized in mid-20th-century kitchens, enabling home cooks to achieve flaky textures without time-consuming pastry techniques.
Seasonal Adaptations
In autumn, emphasize tart apples like Granny Smith and serve with warm apple cider. For winter holidays, add a pinch of nutmeg and a tablespoon of chopped toasted pecans to the filling for nuttiness. In spring or summer, swap apples for macerated peaches or plums with a splash of lemon juice and a touch of vanilla; reduce cooking time so fruit retains a bit of structure. For festive occasions, brush with egg wash and sprinkle coarse sugar for sparkle and crunch.
Meal Prep Tips
Make the apple filling up to 48 hours ahead and refrigerate in an airtight container. When assembling for a party, lay out a simple station with flattened dough rounds, a spoonful of filling, and unwrapped caramels so guests can assemble their own — it’s a fun activity for kids and adults. If preparing for a large crowd, assemble bombs and freeze them on a tray; once frozen, store in labeled bags and bake as needed, adding a few extra minutes when cooking from frozen to ensure the center is warm and gooey.
These little pockets of warmth are the kind of recipe that invites improvisation — try different apples, experiment with spices, or swap caramels for chocolate. They’re proof that delicious dessert doesn’t have to be complicated: with a few pantry staples and a dozen minutes of assembly, you can bring people together over something truly comforting.
Enjoy making them your own, and remember that the best part is sharing: pass the tray, trade tips, and steal a second one when no one’s looking.
Pro Tips
Cool the apple filling completely before assembly to prevent soggy dough and leaking caramel.
Seal each pocket firmly and pinch the dough seams to avoid caramel oozing during baking.
Brush with melted butter and sprinkle cinnamon sugar for an extra-crisp, glossy finish.
For safer eating, allow bombs to rest 4–5 minutes after baking so caramel thickens slightly.
This nourishing caramel apple pie bombs recipe is sure to be a staple in your kitchen. Enjoy every moist, high protein slice — it is perfect for breakfast or as a wholesome snack any time.
Tags
Caramel Apple Pie Bombs
This Caramel Apple Pie Bombs recipe makes perfectly juicy, tender, and flavorful steak every time! Serve with potatoes and a side salad for an unforgettable dinner in under 30 minutes.
Ingredients
Apple filling
Assembly
Instructions
Prepare the apple filling
Peel, core, and finely chop 2 medium apples. In a small skillet over medium heat, melt 1 tablespoon unsalted butter. Add 2 tablespoons packed brown sugar, 1 teaspoon ground cinnamon, and a pinch of salt. Stir in the apples and sauté 6–8 minutes until apples are tender and the liquid is reduced to a glossy coating. Remove from heat and cool completely before assembly.
Preheat and prep the baking sheet
Preheat oven to 375°F (190°C). Line a baking sheet with parchment paper or a silicone mat. Separate the refrigerated biscuit dough into 8 rounds and gently flatten each to about double its original diameter.
Assemble the bombs
Place about 1 to 1 1/2 tablespoons of cooled apple filling in the center of each flattened dough round. Add one unwrapped caramel candy atop the filling. Fold the dough edges up and around the filling, pinching and sealing thoroughly to prevent leaks. Place seam-side down on the baking sheet.
Bake until golden
Brush each sealed piece with 2 tablespoons melted butter and, if desired, sprinkle with cinnamon sugar. Bake at 375°F for 12–15 minutes, rotating halfway, until golden and puffed. Let cool 4–5 minutes before serving so the caramel sets slightly.
Last Step: Please leave a rating and comment letting us know how you liked this recipe! This helps our business to thrive and continue providing free, high-quality recipes for you.
Nutrition
Did You Make This?
Leave a comment & rating below or tag
@moodcooks on social media!
Categories:
You might also like...

Air Fryer Bang Bang Cauliflower
Crispy air-fried cauliflower tossed in a creamy sweet-spicy bang bang sauce — a crunchy, vegetarian appetizer or weeknight favorite that's ready in about 30 minutes.

Air Fryer Buffalo Cauliflower
Crispy battered cauliflower florets tossed in tangy buffalo sauce — a spicy, vegetarian crowd-pleaser ready in under 40 minutes.
Amish Peanut Butter Cream Pie
A nostalgic, no-bake peanut butter cream pie inspired by Amish kitchens—silky peanut butter filling, crunchy crumbles, and pillowy whipped topping in a buttery 9-inch crust.
Did You Make This?
Leave a comment & rating below or tag @moodcooks on social media!
Rate This Recipe
Share This Recipe
Enjoyed this recipe? Share it with friends and family, and don't forget to leave a review!
Comments (1)
This recipe looks amazing! Can't wait to try it.
Comments are stored locally in your browser. Server comments are displayed alongside your local comments.

Hi, I'm Olivia!
What's Popular
30-Minute Meals!
Join to receive our email series which contains a round-up of some of our quick and easy family favorite recipes.